As an Amazon Associate, we earn from qualifying purchases. Some links on this site are affiliate links at no extra cost to you. Our recommendations are based on thorough research and editorial judgment.

How To Turn Crates Into Shelving Units?
Turning crates into shelving units can be easy and fun! First, we need to gather quality wooden crates from stores like Michaels or Home Depot. Next, let’s sand them down for a smooth finish and apply a protective coat—an oil-based finish works great. For assembly, we can stack them, secure with screws, and even add wall mounts for stability. With a little creativity, we can customize our design. Want to find out some cool layout options? Let’s keep going!
Key Takeaways
- Source high-quality wooden crates from craft or home improvement stores for stability and durability in your shelving unit.
- Prepare crates by sanding rough edges and applying four coats of an oil-based finish for enhanced beauty and durability.
- Experiment with different stacking methods, such as vertical or staggered arrangements, to customize your shelving unit.
- Use heavy-duty screws and wall anchors for securely mounting crates to the wall, ensuring proper load distribution for stability.
- Consider adding functional accessories like hooks or wheels to enhance the practicality and versatility of your crate shelving.
Preparation and Materials

Before we plunge into our crate-to-shelving adventure, it’s important to gather the right materials and tools. First, let’s talk about crate sourcing. We can find wooden crates at craft stores like Michaels or home improvement places like Home Depot. Prices can vary, but we should look for quality through a good quality inspection.
Next, we’ll need tools, including a power drill for assembly and a tape measure for spacing. Don’t forget sandpaper for smoothing rough edges!
When selecting crates, we want to check for defects and verify each crate is stable. Once we’ve chosen our crates, we can arrange them in our desired layout—will it be vertical, horizontal, or staggered? Exciting choices await! Additionally, using durable materials will ensure our shelving units stand the test of time and usage.
Recommended Products

FOLDABLE DESIGN - Thanks to its intelligent, foldable structure, the box takes up minimal space during storage and transport. It can be easily folded and unfolded depending on your needs.

Easy to Assemble: : this package comes with 10 sets of wooden crates and assembly tools; Just fix the screws to the long side strips one by one; You can also add paint or decorations, letting you enjoy the fun of hands-on work while creating functional and aesthetic pieces for your space

14 x 10 x 9 Inches Inside Dimensions
Finishing and Surface Treatment

When we think about finishing our wooden crates, it’s not just about making them look good; it’s also about protecting them. By using different finishing techniques, we can enhance the wood’s natural beauty and guarantee durability. For instance, applying an oil-based finish, like Arm-R-Seal, enhances grain and provides lasting surface protection.
We should apply four coats, sanding between them for a glass-smooth surface. Want a rustic charm? We can leave rough surfaces unstained! If we’re after a soft luster, consider finishing wax, which requires a thin application, buffing afterward for a lovely sheen. Additionally, proper maintenance practices ensure that the finish lasts longer and withstands daily use.
Whatever method we choose, remember that a well-finished crate won’t just look good; it’ll stand up to daily use too!
Recommended Products
5HP HELICAL CUTTERHEAD - Powerful 5 HP motor with 100 four-sided carbide knife inserts creates smoother, quieter cutting

𝗣𝗥𝗘𝗠𝗜𝗨𝗠 𝗤𝗨𝗔𝗟𝗜𝗧𝗬: Crafted from Grade A Indonesian teak wood, renowned for its superior quality and durability. Each piece of lumber is carefully selected, ensuring close grain and rich oil content for maximum resilience against weather elements.
𝗦𝗨𝗣𝗘𝗥𝗜𝗢𝗥 𝗚𝗥𝗔𝗗𝗘 𝗔 𝗧𝗘𝗔𝗞: Our outdoor dining set is crafted from Indonesian Grade A teak wood, sourced from government-cultivated plantations. With FSC certification, the lumber is known for its maturity, tight grain, and high oil content, ensuring exceptional quality and longevity.
Assembly Techniques and Configurations

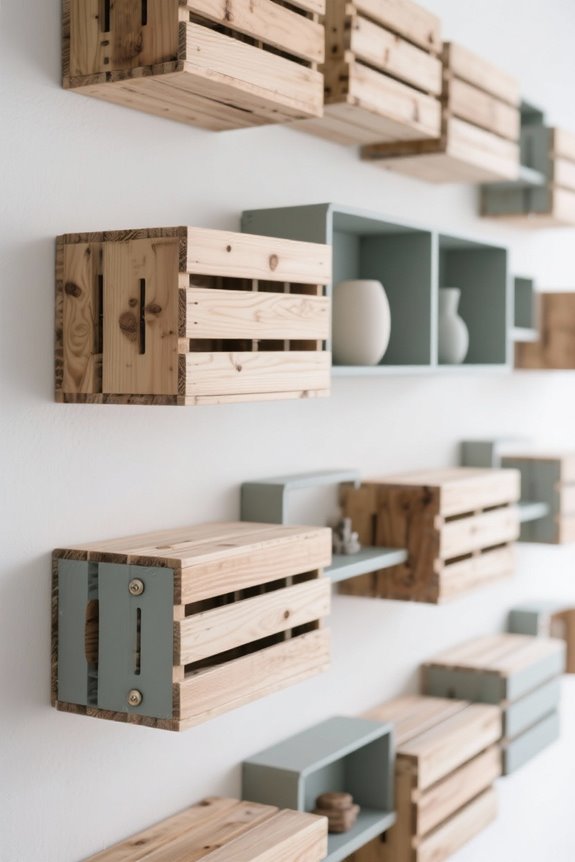
Creating a sturdy shelving unit from crates can be both fun and practical, especially if we think through our assembly techniques and configurations. First, we can use stacking techniques to create vertical shelves, securing crates with screws or brackets for stability. Consider a basic setup where two crates sit side by side with two more stacked on top.
To enhance sturdiness, we should add lateral supports between the crates. This not only reinforces our structure but also helps prevent shifting, which can lead to unfortunate spills—yikes! For visual appeal, let’s try a pyramid setup or tiered shelving to maximize space. Remember, the beauty of crates is in their modular design, allowing us to customize layouts based on our needs and available space! Additionally, incorporating organizational compartments can help us effectively sort and access our items.
Recommended Products

【Perfect Companion Piece】 Designed to match the PureCozy dog crate series, this 40-inch side cabinet completes your modular pet furniture set. Use it as a standalone storage unit or pair with left/right crates.

Depth: 18-7/8 Inch | Height: 60 Inch | Color: Black

Extra large product size: The heavy-duty shelving are 77"W X 24"D X 70"H, and have been widened and upgraded horizontally. They have an extra-large width of 77 inches, which can store more items and are suitable for more usage scenarios, such as garages, factories and warehouses, etc.
Wall Mounting and Stability
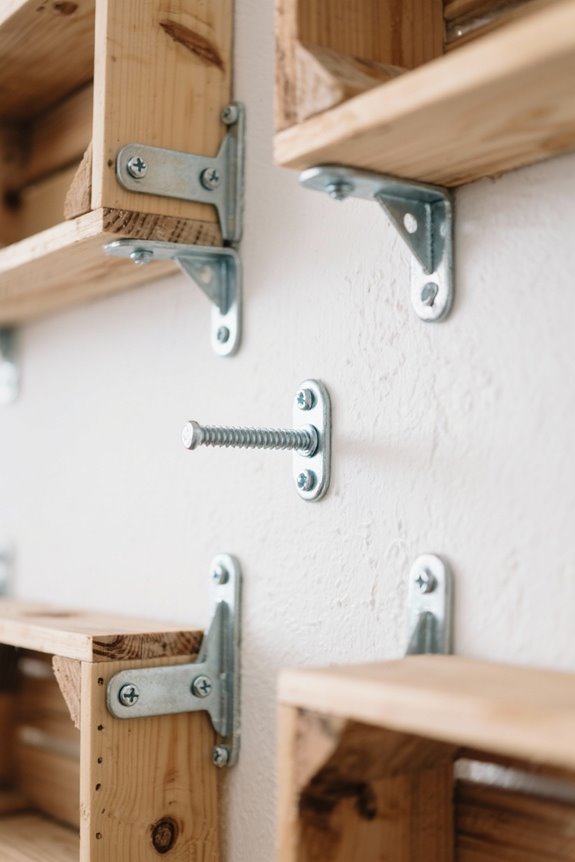
To achieve sturdy wall-mounted crates, we need to focus on how we secure them effectively. First, using appropriate mounting hardware is crucial. Heavy-duty screws and drywall anchors help keep our crates firmly attached to the wall. Then, let’s prioritize stability checks by leveling our crates accurately; nobody wants a slanted shelf! We should aim for proper load distribution to prevent leaning, which can be annoying. If we encounter any wall reinforcements, utilizing them is key—they offer the support our crates need. Finally, don’t forget to check your screws regularly; keeping things tight guarantees long-lasting stability. By following these steps, we’ll create secure shelves that are both functional and pleasing to the eye. Additionally, consider space efficiency when designing your shelving layout to maximize storage areas. Happy crafting!
Recommended Products
【Introducing Our Exquisite Masterpiece】- A spacious and meticulously crafted 8.5' x 11' sanctuary, where every detail exudes unparalleled craftsmanship, including double doors, double-pane glass windows, sleek hardware, and integrated screens and blinds.

Model: 72" Rubber Parking Curb | Color: Black with Yellow Stripes

48 INCH X 10 FOOT KITCHEN HOOD – Short cycle makeup air hoods maintain a comfortable temperature for employees working in a restaurant kitchen. This energy saving hood reliably exhausts the heat, smoke, and grease produced by cooking equipment.
Design Flexibility and Customization
While we often think of crates as simple storage solutions, their true potential lies in the stunning variety of designs we can create together. The design possibilities are virtually endless. We can stack crates in interesting ways or even mix their orientations for unique shelving that suits our spaces. Who doesn’t love a room divider made from crates?
Customization enhances our creativity. For example, we can stain wooden crates to match our decor or opt for colorful plastic ones that cheer up a child’s room. By adding functional accessories like hooks or wheels, we make our crate units not just beautiful, but practical too. Additionally, incorporating adjustable widths can help optimize the use of space in our designs. Let’s explore these features together, and create storage that fits our style and needs perfectly!
Budget Considerations and Tools
When we commence on a crate shelving project, understanding our budget and tools can make or break the experience. First, let’s tackle the budget impact. If we buy five unfinished wooden crates, plus stain and hardware, we’re looking at around $72. But, if we only grab the crates and connecting hardware, we might spend about $51!
As for tool selection, we’ll need basic hand tools like a drill and some sandpaper for smoothing wood. Don’t forget safety gear, too! Additionally, using durable materials can enhance the longevity of our crate shelving units.
To save some cash, we can use leftover finishes or repurpose old crates. It’s a DIY adventure, and with the right budget and tools, our crate project could be both fun and economical!
Recommended Products

Unleash Your Creativity: Transform these 12 unfinished wood crates into personalized masterpieces with your unique paint and embellishments, adding a touch of style to your home décor.

Functional Storage for Any Space: Versatile pine wood crates serve as attractive backdrops for decorative items while providing functional storage in various environments.

Unassembled Wooden Boxes: this package contains 6 sets of unfinished wooden boxes, you can assemble them and use your distinctive paint and decoration, use your creativity to DIY, add personalization to your space by painting, staining or decorating to match your personal touch style, making the wooden box more distinctive
Frequently Asked Questions
How Do I Choose the Right Size Crates for My Space?
To choose the right size crates for our space, we should consider crate dimensions that maximize space utilization. We’ll measure the area, match item sizes, and guarantee easy access while maintaining stability and style.
Can I Use Crates Outdoors for My Garden?
Yes, we can use crates outdoors for our garden! Creative crate displays and thoughtful garden crate arrangements can enhance our outdoor space, but we should make certain they’re properly sealed to resist moisture and decay.
What Tools Are Necessary for Disassembling Crates?
What tools do we need for crate disassembly? We should gather essential tools like crowbars, hammers, and screwdrivers for efficient crate disassembly techniques. They’re necessary to guarantee we safely and effectively break down crates.
How Can I Safely Move Heavy Crate Shelving Units?
To safely move heavy crate shelving units, we should use proper support and effective lifting techniques. Team lifting and equipment like dollies guarantee we minimize strain while preventing injury during the process. Always prioritize safety!
Do I Need to Treat Wood for Food Storage Crates?
Absolutely, we need to treat wood for food storage crates to guarantee food safety. For instance, imagine a farmer using heat-treated crates to store fresh produce, avoiding contamination and maintaining quality during transport.


