As an Amazon Associate, we earn from qualifying purchases. Some links on this site are affiliate links at no extra cost to you. Our recommendations are based on thorough research and editorial judgment.

How To Use Pegboards For Garage Storage?
To use pegboards for garage storage, we should start by evaluating our wall space and selecting the right size. Standard pegboards range from small panels to large sheets, perfect for our tools. Let’s gather some materials like hooks and bins, then plan a layout that puts frequently used tools at eye level. After installing securely, we can organize with accessories like modular racks to keep things tidy. Interested in maximizing our pegboard’s potential? There’s more to explore!
Key Takeaways
- Assess your garage space to identify accessible wall areas for optimal pegboard placement, prioritizing high-traffic zones.
- Choose appropriate pegboard size and material, ensuring it can support the weight of your tools without sagging.
- Plan your layout by positioning frequently used tools at eye level and heavier items lower for stability and safety.
- Follow a step-by-step installation by preparing the wall, securely attaching the pegboard with spacers, and ensuring stability for heavy tools.
- Utilize essential accessories like hooks, bins, and multi-tool racks for organized storage and easy access, enhancing your garage workspace.
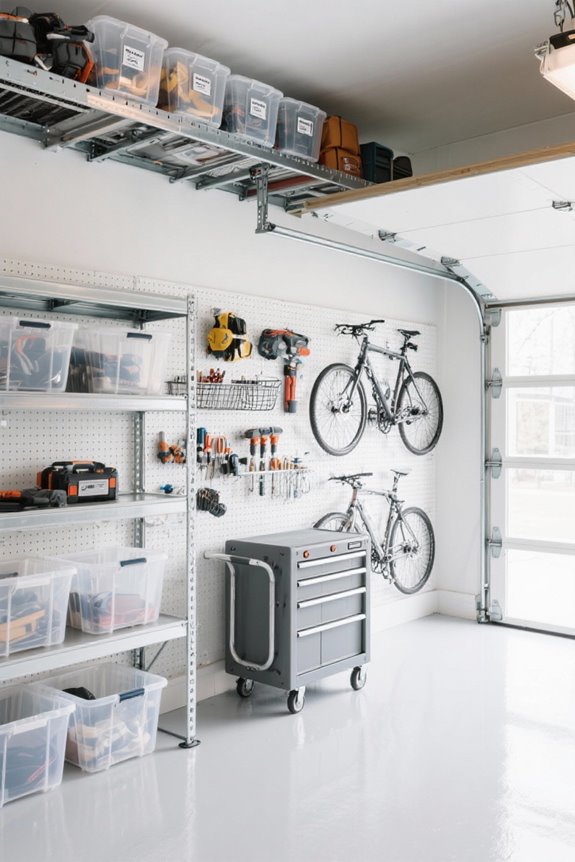
Assessing Your Garage Space for Pegboards
When we think about using pegboards for garage storage, the first step is evaluating our space effectively. We need to do a space analysis, starting by identifying walls with the most accessible, uncluttered areas—like above workbenches or near the entry. It’s important to mark zones where we frequently use tools, prioritizing their proximity to high-traffic areas for efficiency. Speaking of traffic flow, we should avoid placing pegboards behind large fixtures that hinder access. Also, measuring our chosen wall space helps us plan laid-out designs. Do we want to trip over misplaced tools or awkwardly reach for them? Let’s keep it smart and functional, ensuring our garage remains a useful space for our needs! Additionally, incorporating adjustable hooks can enhance the versatility of your pegboard setup.
Choosing the Right Pegboard Size

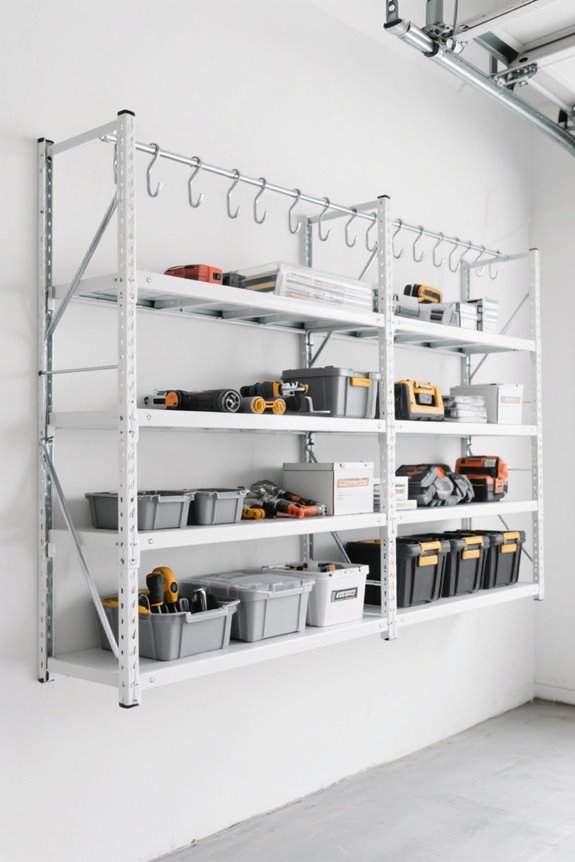
How do we pick the right pegboard size for our garage storage needs? First, let’s look at pegboard dimensions. Standard sizes range from small 8 x 20 inches to larger 4 x 8 feet panels. For most of us, using stacked panels (like 2 x 4 ft modules) will give us more coverage. Thinner boards, like 1/8 inch, are lighter but may sag under weight. If we’re storing heavier tools, we should consider thicker options like 3/16 inch or even metal pegboards. Remember, larger panels can be cumbersome, so let’s verify we’re comfortable with our choice. Custom sizes can also help if we’ve got a unique space. Additionally, selecting a pegboard with ventilated designs can enhance air circulation around stored items. What’s our plan for organizing?
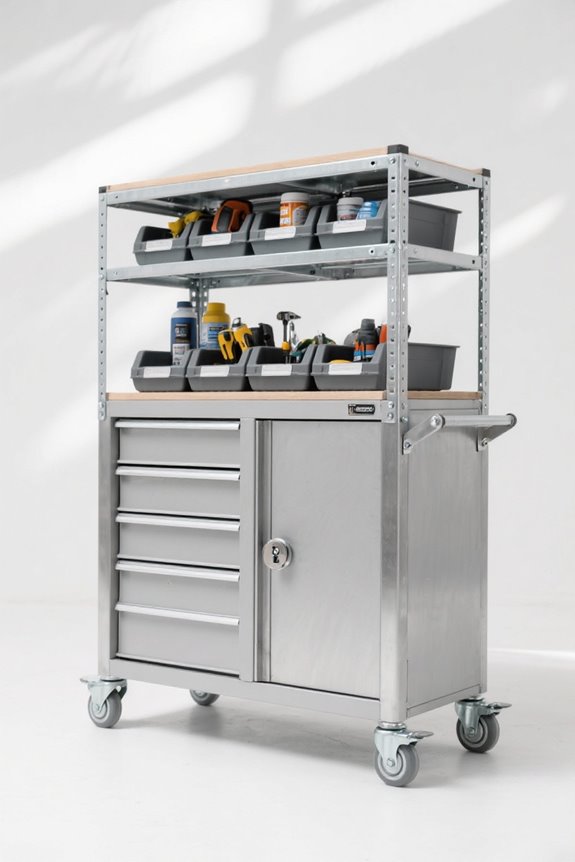
Gathering Essential Materials

Gathering essential materials for our pegboard installation is crucial to guarantee everything goes smoothly. We’ll need a variety of tools and items for this project. Here’s a quick list to confirm we have everything ready:
- Tools: A drill, screwdriver, level, tape measure, and safety glasses.
- Pegboard: Choose from wood, metal, or plastic panels.
- Hardware: Screws, anchors, and mounting spacers are necessary for secure attachment.
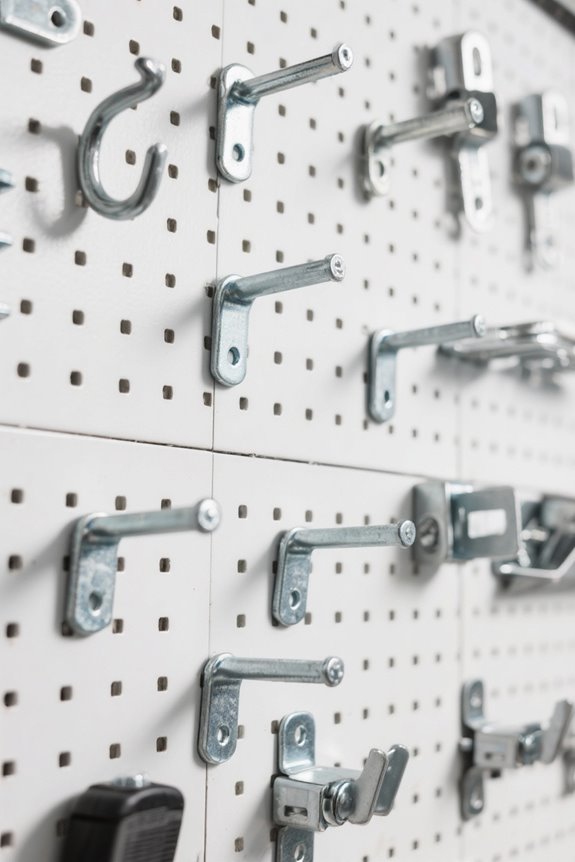
- Hooks & Holders: Grab a mix of pegboard hooks, baskets, and even magnetic holders for a unique storage solution.
Additionally, selecting heavy-gauge steel for your pegboard will enhance durability and longevity. Don’t forget wood glue and clamps if we need extra support. With these installation tips in hand, we’ll be set for efficient organization and a functional garage space. Ready to tackle the project? Let’s do this!
Planning an Efficient Layout

Planning an efficient layout for our pegboard setup is the next exciting step after gathering our materials. First, let’s assess our tool inventory to figure out what we really need to store. We should place frequently used tools at eye level, ensuring easy access. It’s also smart to put heavier items lower down for stability—trust us, you don’t want those falling!
Visual organization is key, so consider color-coded labels or bins for similar items. We can even create a mock setup to visualize our layout before finalizing it. Remember, effective space optimization can make a huge difference. With a little planning, we’ll have an organized, efficient pegboard that makes finding our tools quick and simple! Additionally, incorporating stackable designs into our storage solutions can enhance vertical space utilization.
Exploring Mounting Options
When we take the time to explore our mounting options for pegboards, we can greatly improve the functionality of our garage. One effective technique is mounting directly to wall studs. This gives us solid support for heavy tools, though it limits our layout choices due to stud spacing.
Alternatively, we can use wooden spacers or furring strips, allowing more flexibility and consistent spacing for peg hooks. If we’re dealing with drywall or concrete, toggle bolts or masonry anchors become our best friends for secure mounting.
For convenience, pre-packaged mounting kits can simplify our installation. Just remember that the right hardware and wall materials matter! With these techniques, we’re on our way to a well-organized garage space. Additionally, incorporating versatile storage options can enhance the overall organization and accessibility of your tools.
Step-by-Step Installation Process
Now that we’ve explored various mounting options for our pegboards, it’s time to get down to the nitty-gritty of the installation process. First, let’s prep our wall. Identify a good spot, preferably over an open stud bay for added support. Clear off any debris, and grab a stud finder to locate those studs, typically 16 inches apart.
Next, we’ll attach wooden spacers to create a gap for our hooks. Keep these level—they’re essential for a flat pegboard!
Now, let’s position the pegboard, insert screws through the holes, and tighten them snugly without going overboard to avoid damage. Finally, inspect everything for stability. Additionally, ensure that the pegboard can support heavy-duty construction to accommodate various tools and equipment. And just like that, our wall’s ready for some serious organization!
Organizing Tools for Easy Access
Organizing tools for easy access can transform a chaotic garage into a well-oiled machine. We should start by selecting essential tools—wrenches, hammers, and saws—to mount on our pegboards for quick retrieval. Using J-hooks for wrenches and L-hooks for heavier tools optimizes our storage.
Consider the pegboard size; a 24″ x 16″ panel fits most wall spaces perfectly. By incorporating plastic bins for small items like screws or drill bits, we maintain tool visibility and keep everything organized. Plus, hanging tools helps us achieve pathway clearance, so we can navigate our workspace safely. Remember, flexibility in arrangement allows us to adapt as our tool collection grows! Additionally, using tool drawer organizers can further enhance the efficiency and organization of your workspace. Let’s get organized and make our garages more efficient together!
Maintaining and Expanding Your Pegboard Storage
After getting our tools organized for easy access on the pegboards, it’s time to think about keeping that system in tip-top shape. First, let’s guarantee we’ve got proper pegboard reinforcement, like securing our pegboards to wall studs or using sturdy spacers—this prevents pulling away and damage. Regularly checking tool spacing is key to avoid overcrowding. We should inspect hooks for looseness, which can lead to tools tumbling down at the worst times.
Let’s also keep things clean by dusting the pegboards and using appropriate solutions for metal types. As our collection grows, let’s assess our tool inventory and adjust the layout or add hooks, guaranteeing everything remains easy to grab when we need it! Additionally, incorporating decorative storage bins can further enhance your organization strategy by providing stylish solutions for smaller items.
Enhancing Functionality With Accessories
When we think about enhancing our pegboard storage, the right accessories can really make a difference. Accessory innovation allows us to customize our setup for ideal tool organization. For instance, a variety of hooks is essential for hanging different tools like wrenches and screwdrivers. Plus, plastic bins with locking pins help secure smaller items, allowing us to declutter.
Let’s not forget multi-tool racks! They keep sets of tools visible and accessible. Adding labels enhances efficiency, making it easy to find what we need quickly. Suddenly, our once chaotic garage is a beacon of organization! By integrating these accessories, we not only improve functionality but also create a space that’s easy to maintain and a joy to work in. Additionally, incorporating modular designs can further enhance the organization and adaptability of your pegboard setup.
Frequently Asked Questions
Can I Paint or Customize My Pegboard for Aesthetics?
Yes, we can definitely paint and customize our pegboard for aesthetics! We have various paint options and can explore different customization techniques, like stencils or complementary colors, to enhance its visual appeal in our workspace.
How Much Weight Can a Pegboard Typically Support?
Typically, a pegboard supports 20 to 50 pounds per square foot with proper installation. For heavier loads, we can upgrade to metal pegboards, achieving weight capacities between 100 to 300 pounds depending on the setup.
Are There Weather-Resistant Pegboards for Outdoor Use?
Like a shield against the elements, yes, there are weather-resistant pegboards designed for outdoor applications. Utilizing durable weather-resistant materials guarantees our storage stays organized and intact, no matter rain or shine. Let’s invest wisely!
What Are the Best Tools for Cutting Pegboard?
For pegboard installation, we recommend using fine-toothed saws, jigsaws, and tin snips as the best cutting tools. They guarantee clean edges and precision, making our projects safer and more efficient. Let’s cut with confidence!
Can I Use Pegboards in Other Areas Besides the Garage?
Absolutely, we can use pegboards in other areas, like our kitchens for organization or craft rooms to keep supplies tidy. They’re versatile spaces that enhance both functionality and aesthetics, adapting perfectly to our needs.